
Hello, friends in this article I will show you step by step how I was able to create a Bootable Installation USB Pendrive for Kali Linux or Debian or for that matter any Other Linux OS.
Symptoms of the Problem
There exist several tools for creating a bootable USB pen drive, for example, YUMI and Rufus. Using these tools we can create a live bootable pen drive for Kali Linux, Debian, and other Linux distros. But when we try to install Kali Linux form this pen drive we get error messages something like this
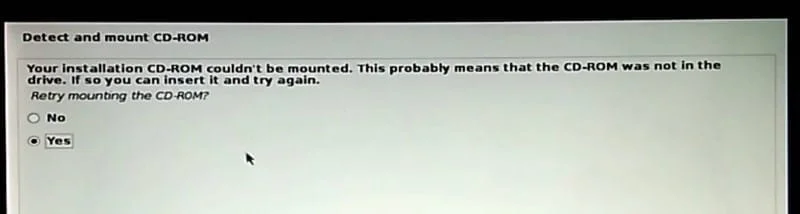
Can not Detect CD-ROM, CD-ROM couldn’t be mounted, CD-ROM Integrity error. Retrying also again leads to the same error message again and again.
Cause of the Problem
On searching the web the root cause of the problem appears to be a bug in the Debian installation wizard. Due to this bug, the installation wizard fails to mount the installation medium when booting from a USB drive created using tools like Rufus and YUMI.
Steps to Solve It
Do not worry friends I was able to solve this problem easily using the method mentioned below. The trick for solving the problem is to create a bit for bit replication of the ISO file on to the USB drive. By doing this we are able to bypass the bug and the installation wizard is able to mount the USB drive thinking it to be a DVD-ROM. The tools required for performing this task is Win32DiskImager and HP Disk Format Tool. The download links for these two tools are mentioned below in the step by step instructions.
Step 1: Download ISO file and Validate it Using Checksum
Download the ISO file of the Linux Distro for which you want to make USB installation drive. Make sure to check the integrity of the downloaded ISO file by generating Checksum. If you are unaware of how to do it we will be creating a quick guide for that. Subscribe now to our blog to get that guide as soon as we release it.
Step 2: Get a Blank USB Pendrive
You will require at least a USB drive of 4 GB. If your ISO file is larger than 4 GB then you require a drive larger than the ISO file size. If you have data present on the USB pen drive make sure you take a backup of it on your computer.
Please note the process mentioned below will completely erase any data present in the USB pen drive.
Step 3: Download and Install Win32DiskImager
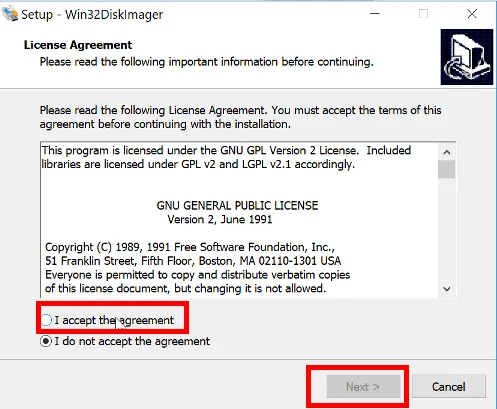
Using this link download Win32DiskImager: https://sourceforge.net/projects/win32diskimager/. Install the software using the installation wizard make sure to grant it administrative privileges.
Step 4: Create a Bootable Installation USB Drive using Win32DiskImager
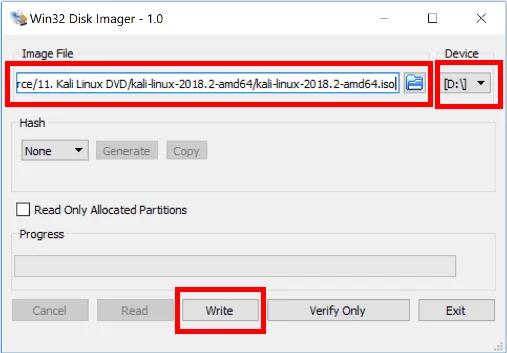
- Open the Win32DiskImager tool by clicking on the shortcut icon
- Under the image file click on the folder icon
- Browse to the folder which has the iso file.
- Change file type to *.* from Disk Images(*.img *.IMG)
- Under the Devices select the drive letter of your USB drive make sure you double check the USB drive letter as selecting an incorrect drive letter will cause complete data loss on the drive
- Click on Write it will ask you to confirm your drive letter after verifying it click on Yes.
It will start the write operation wait until the write operation ends. This might take 10-15 minutes depending upon your ISO file size and USB write speed.
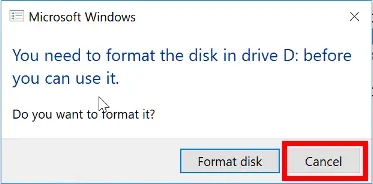
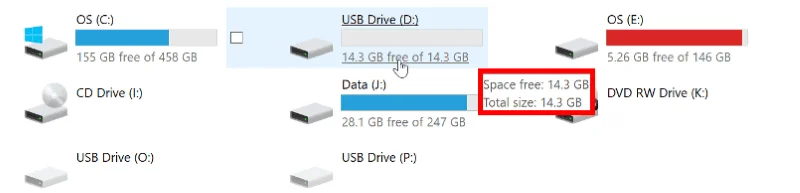
Please note after the process is completed your computer might not be able to read the pen drive using windows explorer. Your pen drive capacity also will not be displayed correctly. You might also see an error message as shown above, in that case, make sure to click on cancel. Once you are done using the pen drive for OS installation you can follow the last step for restoring your pen drive back to its original capacity.
Step 5: Boot from USB drive and Install OS
Now you can boot using this USB pen drive. Make sure to unplug other USB storage devices from your computer. You might have to make BIOS changes to ensure your computer boots from the USB drive.
Check out our step by step guide for Configuring BIOS for booting a Linux Distro from USB or DVD/CD ROM.
Step 6: Download and configure the HP Format Tool
Now once you are done with using the pen drive for installation of your OS you can restore the pen drive back using this HP Format Tool. Just follow the steps to configure the HP Format Tool.

- Download HP USB Disk Storage Format Tool from here:https://filehippo.com/download_hp_usb_disk_storage_format_tool/
- Right click on the downloaded EXE file and select Property.
- Click on the compatibility tab.
- Under this check, the checkbox Run this program as an administrator.
Step 7: Restore Pendrive to Original Capacity using HP Format Tool
You can easily restore your pen drive to its original capacity check out the steps mentioned bellow
- Close all open windows explorers and any other program accessing files on the USB Drive.
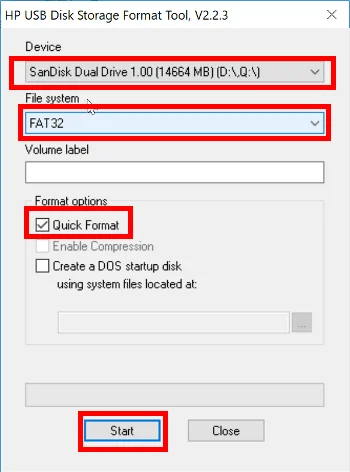
- Click on HPUSBDiskStorageFormatTool.exe file to open the tool.
- Under Device select, your Pendrive from the drop down menu make sure to double check the device to ensure you are selecting your pen drive only.
- In File system select FAT32.
- For format options make sure to check the Quick Format check box.
- Click on Start it will give you a warning message to confirm the drive you are formatting after checking it click on Yes to start the formatting process.
After the formatting is complete your USB pen drive should have its size restored and it should be able to be detected and used through windows explorer.
I hope you liked this article and it helped you solve your problem. Share this article with your friends and family members whom you think could benefit from this. If you have an alternate solution or if you are facing problem following this guide. Post in your queries in the comment section below.
At wishfulfil.com we provide you the with the latest updates on open sources software, Linux installation guides, OS reviews, tutorials, tips and tricks, troubleshooting guides and much more. Subscribe to our newsletters to get regular updates straight to your inbox. Thanks for reading friends see you later bye.