
Nowadays you can buy a computer or a laptop produced by a huge amount of manufacturers. Despite almost all the stores sell PCs and laptops with preinstalled Windows, in most cases you can easily use Linux as an alternative. The best way to install it on your device is to boot Linux pendrive or DVD.
To make it possible, there is a BIOS mode that allows you to make a number of settings before turning on the computer. The latest devices have UEFI mode, which is the modified BIOS. Despite all the advantages, the problem is that some manufacturers enable Secure Boot mode option. In this case, when you try to install Linux or boot it from the external storage device, you see the “Secure Boot Violation” error message.
How to boot Linux pendrive or DVD on your computer or laptop? How to disable secure boot mode on the latest devices? Let’s look closer.
The difference between BIOS and UEFI
BIOS is a software shell, stored on the motherboard, working apart from the OS. It controls all the built-in components immediately after you turn on the PC. Due to this, when the operating system fails, you can reinstall it.
On the latest devices, the manufacturers use UEFI that is the modified BIOS. It has the improved interface, often support the mouse pointer and provides more settings. But the major innovation is the Secure Boot mode. It is designed to protect the system from any malicious software. Let’s shed more light on it.
What is Secure Boot Mode
Secure boot is a UEFI function that prevents unauthorized operating systems and software from running when the computer starts up. That is, Secure Boot is not a function of Windows 8 or Windows 10, but the operating system uses it. And the main reason for which it may be necessary to disable this function is that the computer or laptop does not work from the USB flash drive (although you prepared the boot drive correctly).
If Secure Boot is enabled and you are going to boot Linux pendrive or DVD to install Ubuntu, Linux Mint or Fedora, you will get a message “Secure Boot Violation”. So, you will have to disable Secure Boot in UEFI.
How to boot a Linux Pen Drive or DVD
Old devices
If you bought your devices a long ago, you can boot Linux Pendrive or DVD in a few simple steps. You will even not need to enter the BIOS. Follow these steps:
- Get the bootable USB pendrive or DVD with Linux. You can buy it on our website. Insert it into a free USB port or DVD drive.
- Enter the boot menu to choose a device to boot the system. No matter what device you have, try one of the following keys: Esc, F12, F11, F10, F9, F5. If you use a laptop, you may require holding Fn plus one of the mentioned keys.
- Select the Linux pendrive or DVD from the list with Up and Down keys and press Enter.
New devices
If you have quite a new PC or laptop and your trial to boot Linux Pendrive or DVD failed, try the following steps.
Step 1. Enter BIOS or UEFI
To enter BIOS or UEFI you have to press a specific button while turning on the PC. It depends on the laptop or desktop motherboard manufacturer. So, if you have a desktop PC, and you are not sure what motherboard you have, install the AIDA64 app. It shows full detailed information about the system.
How to find it? When you launch the app, in the main window click Motherboard — Motherboard, and find Motherboard Name. If you have a laptop, there is no need to look for motherboard info — the key depends just on the manufacturer.
Here is the list of keys you may have to press to enter BIOS or UEFI:
Laptops
- Acer — Del, F2, F12, F1, Ctrl+Alt+Esc. In some cases, you may require holding the button.
- Asus — F2, Del, Esc, F10 key be pressed instead. In some cases, you may require to hold the button or press it repeatedly.
- Compaq — F10 (when the cursor is blinking on some models), F1, F2, Del.
- Dell — F2 (repeatedly), Ctrl+Alt+Enter, Del, Fn+Esc, Fn+F1.
- eMachines — Tab, Del, F2.
- EVGA — Del (repeatedly).
- Fujitsu — F2.
- Gateway — F1, F2 (repeatedly or press and hold).
- Hewlett-Packard (HP) — F1, F10, F11, F12, F2, Esc, Esc and F10 in several seconds).
- IBM — F1, F2.
- Lenovo — F1, F2, Ctrl+Alt+F3, Ctrl+Alt+Ins, Fn+F1, small button close to the power button.
- Micron (MPC Computers) — F1, F2, Del.
- NEC — F2.
- Packard Bell — F1, F2, Del.
- Samsung — F2 (in some cases repeatedly).
- Sharp — F2.
- Shuttle — F2, Del.
- Sony — F1, F2, F3.
- Toshiba — F1, Esc, F12.
Motherboards
Here we listed the possible keys according to the manufacturers.
- Delete — abit, ASUS, BFG, BIOSTAR, DFI, ECS Elitegroup, EVGA, Foxconn, GIGABYTE, JetWay, Mach Speed, MSI (Micro-Star), PCChips, SAPPHIRE, Shuttle, Soyo, Supermicro, TYAN, XFX.
- F2 — ASRock, Intel.
- Ins, F10 — Asus.
- F1 — PCChips, ECS Elitegroup
- Ctrl+Alt+Esc — Shuttle.
- F4 — TYAN.
Step 2. Disable secure boot.
Here are a few examples how to disable Secure Boot in different UEFI interfaces. Most motherboards use a similar interface.
- Asus: Boot — Secure Boot — OS Type — Other OS — F10 to save. Another option: Security or Boot — Secure Boot — Disabled — F10.
- HP: System Configuration — Boot Options — Secure Boot — Disabled — F10.
- Lenovo and Toshiba: Security — Secure Boot — Disabled — F10.
- Dell: Boot — UEFI Boot — Disabled — F10.
- Acer: the Secure Boot item on Acer laptops is on the Boot tab of the BIOS or UEFI settings, but by default, you can not disable it. On Acer desktops, the same function is disabled in the Authentication section. (You can also find the option in Advanced — System Configuration). In order to make the option available on Acer laptops, on the Security tab, you must set a password using Set Supervisor Password and only then will disable the safe boot mode.
- Gigabyte: BIOS Features — Secure Boot — Disabled — F10. Additionally select CSM — Always, and Boot Filter — UEFI and the previous version.
On most laptops and computers, you will find the same options. In some cases, some menus may differ, for example, on some laptops, to disable Secure Boot you may require to choose Windows 7 mode, this is equivalent to disabling the secure boot.
Step 3. Enable BIOS Legacy mode.
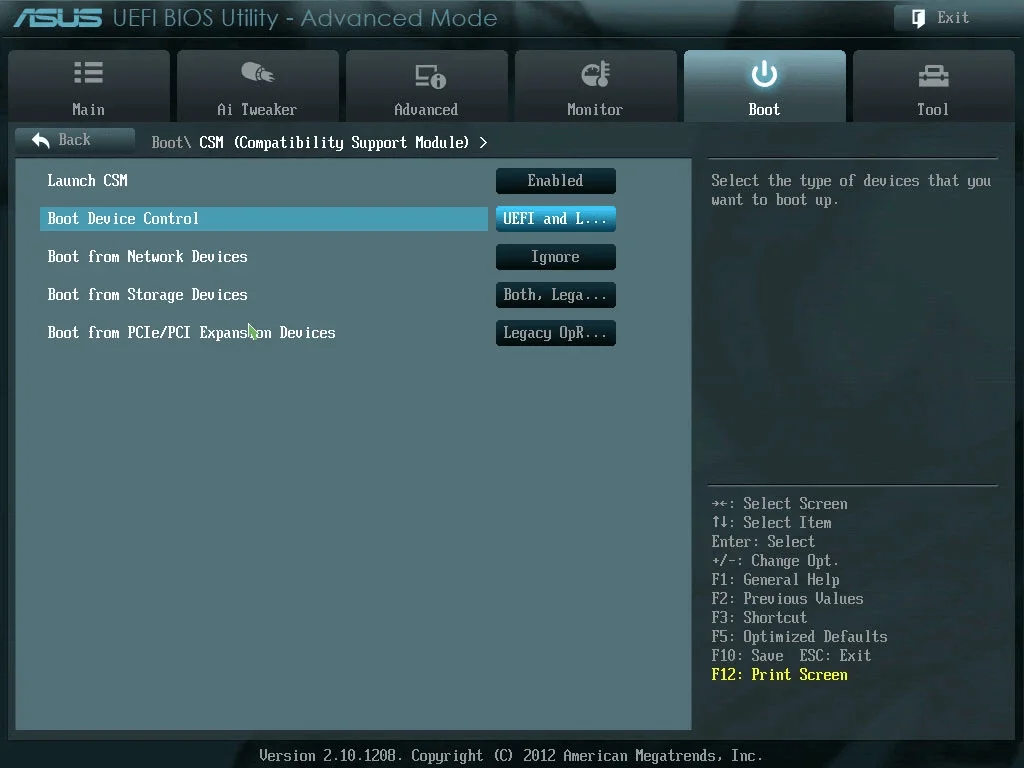
In order to boot Linux pendrive or DVD successfully, change the boot mode. Not leaving the BIOS or UEFI, find Boot options tab.
There you can find one of the following names:
- Legacy Support — On or Enabled.
- Legacy CSM — On or Enabled.
- Launch CSM — On or Enabled.
- CSM — On or Enabled.
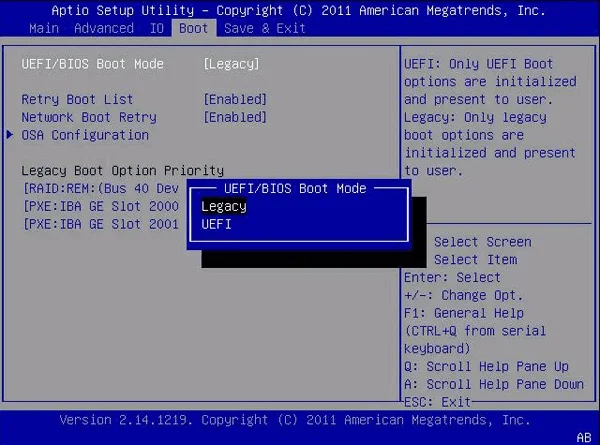
- UEFI/Legacy Boot — Both or Legacy Only.
- Boot Mode — Legacy Support.
- Boot Option Filter — UEFI and Legacy, UEFI First, Legacy First, or Legacy Only.
- UEFI/Legacy Boot Priority — UEFI First, Legacy First, or Legacy Only.
Step 4. Change the device boot order so that the bootable device is on the top.
- Choose Boot — Boot Device Priority or Hard Disk Drive Priority. Note that the bootable flash drive is often defined as a hard drive, so you should change the settings in this section.
- Using Up/Down or F5/F6 keys, move the bootable device on the top.
- Press Enter and F10, and reboot the PC.
In fact, it is not difficult to boot Linux pendrive or DVD on your PC. Just follow our instructions and you will get success.